Friday, April 29, 2011

Collings CL Deluxe Custom

Do you want a guitar that plays as well as it looks or better?
The following pictures where stolen from the Collings site
All opinions expressed are my own!


Monday, April 25, 2011

GIBSON THE PAUL CIRCA 1978 - rewired

Make Your Guitar
Gig Proof
Upon removing the back cover over the potentiometers and switches of this Gibson The Paul guitar, we can see some colored wires (green & black). These wires weren't factory installed. They were basic 14 gauge wire from the local electronic store and that itself isn't bad but the vinyl was melted and wire is exposed. I wanted to limit potential electrical shorts and to make this guitar road worthy and gig proof.

I took this picture of the wiring prior to swapping it out.
Before


I bought the new vintage wire from Stew Mac. This wire is called vintage pull back 22AWG gauge (Link) wire. I carefully removed the old wire using my Weller Soldering iron. Using the old wire as a length template and then double checking the length. I carefully replaced the wire lead between the potentiometers and input jack. I also replaced the two 0.022 mf (microfarad) capacitors.
This photo shows the replacement vintage wire.
After


Sorry about the blurred photo's! The important part is to make certain you make good solder joints. I prefer the 60/40 lead solder (Read about solder here). The solder joint should be smooth and shiny. The last thing you want to happen at a gig is to have a guitar lose connection from a loose wire. Double check all of the work you have completed!
Put it all back together and tested it before replacing the cover. It looks better to me now because I like the vintage pull back wires and I like working with those wires as well.

The Gibson THE PAUL guitar is unique because it is a flat top. It's not carved. I like the ebony neck and jumbo frets. This guitar has a the non original Gibson TP-6 tail piece with fine tuners. The guitar isn't the lightest guitar as it is solid walnut. The finish on the neck it well worn. It has stock Grover tuners and simple dot abalone inlays. The owner paid $400 for it back in 1978. Nice tone and plays well with a neck a "hair" larger than the later Les Paul 1960 series necks on the Les Paul Classics. I don't like the 17 degree neck angle but that is about it. Nice guitar and if you can find one a used one - Buy it!

This is the Gibson THE PAUL

This guitar has been played!

A little buckle rash!!


The owner of this guitar!


Thursday, April 21, 2011

Iggy and the Stooges Honor Their Late Guitarist Ron Asheton

Photograph by Melanie Maxwell/ AnnArbor.com

April 20, 2011

Iggy Pop and the Stooges paid tribute to the late Ron Asheton at Ann Arbor Michigan's Theater.


Lady Gaga Connects With Queen Guitarist For New Track

Lady Gaga Connects With Queen Guitarist For New Track

Horrifying Video of Tsunami in Sanriku Japan

Unfortunately, this is the second Tsunami I've posted on this blog. The first Tsunami I blogged was the Samoan Tsunami.

This isn't about fun things. This is about reality... The video is horrifying! A city is erased by mother nature. The point is that we should all be grateful and enjoy when life is easy and well. Most of our problems are pale in comparison to toil that many face today.

We’ve seen a lot of footage of the tragic Japan tsunami, but this clip is the most horrifying yet. Entitled “South Sanriku — Tsunami seen from Shizugawa High School,” it’s shot from high ground, but toward the end of the video you can see panicked residents running for their lives.

Almost as dramatic as the video is its audio track, where even if you don’t speak Japanese, you can tell the people are expressing concern at the beginning, but by the end, their voices have reached a high level of panic and horror as they watch their homes washing away.

Shortly after the tsunami, one survivor called the oncoming deluge “a gigantic pile of garbage coming down the street.” That’s an apt description, as you can see an entire town reduced to a huge pile of watery debris in a matter of minutes. Shocking.

Wednesday, April 20, 2011

K.K. Downing quits Judas Priest after 40 years!

K.K. Downings
Quits


British rockers Judas Priest are famous for breakin’ the law, breakin’ the law (at least in song). But today it was announced that guitarist and founding member K.K. Downing has broken with the metal muthas after 40 years of service.

In a statement on the official Judas Priest website the band announced “with regret” that Downing has retired and will not be joining them on their forthcoming tour. Downing will be replaced by a British guitarist called Richie Faulkner.

Essential Tools For Performance

Prevent Bad Gigs
By
Being Prepared !


Frustration can be avoided if you carry several tools to gigs with you. I would also recommend wrapping the tools in a bright colored tape so they are easy to locate during dimly lit situations.

This is my list (average cost):
  1. Tool box - small unit about the size of an average lunch box. Cost ($10 to $30 dollars)
  2. Multimeter ($20 to the sky for a nice Fluke meter)
  3. Spare fuses, batteries and pre Amp tubes (average about $50 total)
  4. Multi tip screw driver or a set of jewelers screw drivers ($15.00)
  5. Needle nose pliers ($10)
  6. Wire cutters [one might find dual purpose needle nose] ($10)
  7. Flashlight (torch) ($15)
  8. GFCI surge protector ($50
  9. Ground fault receptacle and outlet tester ($5)
  10. Spare guitar lead/cord/cable ($50)
  11. Spare power cord ($15)
  12. Duct tape/gaffer tape [bright colored] ($5)
  13. Extra strings ($10)
  14. String winder ($15)
  15. Micro towel ($2)
  16. Electrical tape ($2)
  17. Emory board ($2)
  18. Detoxit D5 electronic cleaner ($10) works great on switches and pots!
Peace of mind isn't cheap with this total kit being close to $300 dollars (USA). However, if you have to run around borrowing stuff or cannot play the gig then the cost is immeasurable and your reputation will be tarnished (and you don't get the fringe benefits).

Check your power source with a ground fault outlet tester and prevent damage to your equipment or premature DEATH! Use power conditioners and GFCI surge protectors! I've had my Mesa Lonestar Special blow pre-amp tubes, my Marshall 2203 lost a fuse, broken strings and had guitar leads die so be professional, prepared and stay alive to play again!


Ground Fault Receptacle & Outlet Tester


Anvil Tool case is sturdy and has plenty of room (I bought this years ago!)


Ha Ha! Beautiful woman is always a welcome addition!


Marshall Amps - Slash's AFD 100 and Yngwie Malmsteen's YJM 100

Chasing Tone?
A few nice videos from the Andertons. These amplifiers are designed for performance rather than practice. Neither of these two amps are built for your dorm or apartment! The numeric 100 value should be a drop dead clue to the actual power being used.

I love a lot of different amps for the tones they deliver but one thing is certain with these beasts - You better have deaf neighbors or live in a remote location or risk visits from your local police. Better yet, rent a jam space. I'd certainly recommend ear plugs because not driving these amps at top power is counter productive and yields an anemic tone. Besides, why buy 100 watts and attenuate the signal. Enjoy these informative videos.


Link to Marshall's AFD 100 page - This amplifier is available at this time 4/2011 in the USA due to safety certification requirements. Engineers at Marshall are diligently working on a American version that will not suffer compromised tone (God forbid!).

Friday, April 15, 2011

Seymour Duncan YJM High-Speed Volume Pot


I bought the Seymour Duncan YJM (Yngwie J. Malmsteen) 250 K potentiometer as an upgrade and effect for one of my Fender Stratocasters. The purpose of this pot is to facilitate quicker volume swells. This unit is also available in a 500 K resistance version. Most high end musical instrument stores should start to carry these dual purpose pots. One purpose would simply be an upgraded replacement of the inexpensive pots that often are installed in inexpensive guitars. Another purpose would be as an effect which would facilitate volume swells made popular by Yngwie Malmsteen and others.

These pots work well whether you wish to swiftly increase or decrease your volume. The taper is nice and the amount of finger resistance is minimal. I purchased, played and sold guitars where simply turning the volume or tone pots required a herculean effort. The YJM's do not require brute strength in order to adjust the potentiometer setting . In addition, you don't have to shell out a ton of bucks on Ebay to buy some "used" pots at an exorbitant price. However, the YJM potentiometers are NOT cheap at about $12.00 dollars street USA. Using time as a function of test acceptance standards is not applicable at this time so durability is unknown but Bourns switches are usually very reliable. You need to ask yourself if the lightning quick speed of this switch is worth triple the cost of a standard potentiometer!

So far these YJM High-Speed volume pot switches are not compatible with the Fender S1 volume potentiometer. That fact could be a drawback for a lot of musicians using late model Fender guitars that are equipped with the S-1 feature.

Seymour Duncan products consistently please me and they must please others because the company has been around for over 35 years!

Whether you are simply replacing your volume pot or want some of that pseudo synth volume swells like Joe Bonamassa these potentiometers will satisfy your needs. In conclusion, it is my opinion that these potentiometers work as the packaging advertises and most guitarists will like these potentiometers.


Yngwie Malmsteen is relentless and inspires guitarists with fury!

Fixing a Dented Poly coated guitar

Today I repair my Taylor 514ce

So I smacked my Taylor guitar and dented it nicely. Damn!

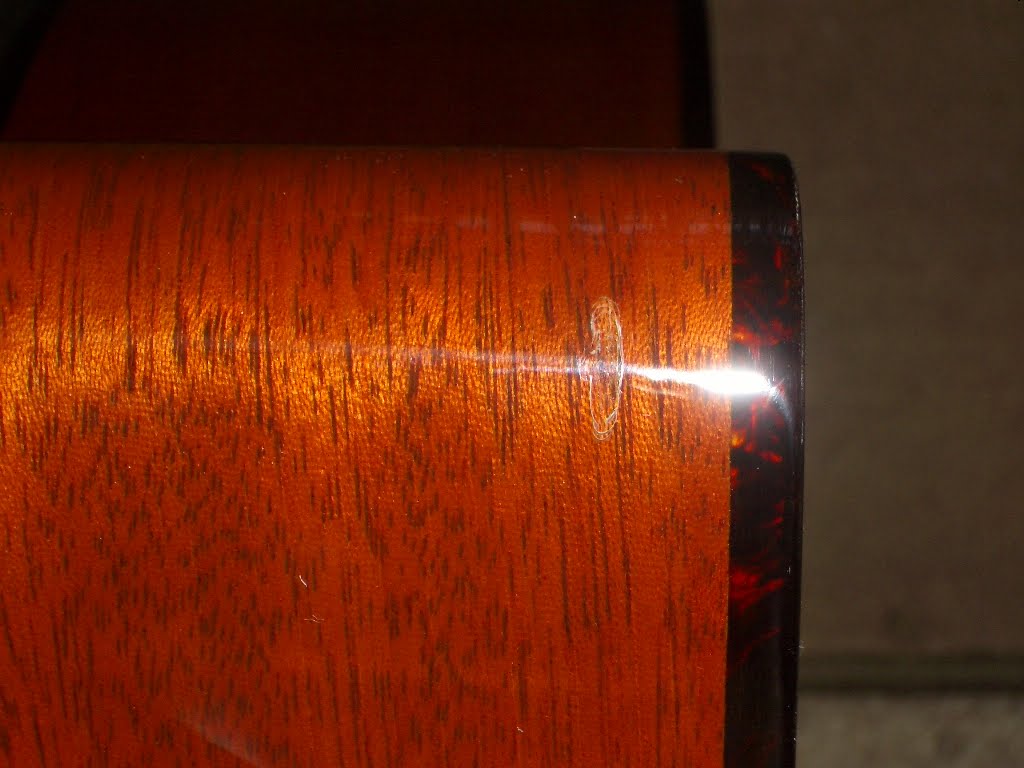
The dent is about 0.5mm deep!


It is important to use resources at hand. There are many repair people out there but the gold standard is set by Frank Ford at FRETS.COM. I gleaned this repair information from Frank's website and I strongly urge you to go directly to the source as I'm only a disciple.

I know that Taylor uses a Polyurethane UV cured finish so lacquer is not compatible for this dent fill. At this point in time only Cyanoacrylate will work for my given problem.

Unfortunately, in my haste I failed to take a photo of the damage at it's worst.

The damage was about 0.5 mm deep on the edge of the lower front corner of the guitar.


The damage is still visible even though the dent is partially filled - It will get better!

First, I cleaned up the damaged area with a razor scalpel to remove the shredded micro burrs created by the initial impact damage. Be certain to remove any flakes or slag left over from the damaged region. It is better to chip and cut away the damaged area (even if it seems like you are exacerbating the problem). I then used Naphtha to remove any residues of wax, skin oils and anything that would impair the adhesion of my fill solution. For the fill I used CA glue or better know as Super Glue but more appropriately know as Cyanoacrylate. THIS IS IMPORTANT: I used two viscosities of glue, a thick solution which I purchased from Stewart MacDonald, a second mixture was the normal viscosity and I applied the thin coat once a day for about 3 days (IMPORTANT) allowing 24 hours to cure BEFORE reapplying and cleaning the guitar affected surface with naphtha before each application of CA .

(SUPER GLUE - CYANOACRYLATE - will glue your skin together. Use with caution!)

It is important to approach this problem patiently. I found that quickly filling the gap often generates air pockets in the hardened glue.

I filled the gap on a daily basis for a few days until I achieved a smooth lake of plastic filling the dent. While the CA glue was fluid I could manipulate it on the surface using a clipping partial of a business card (white heavy bond paper will suffice). I used the card for minor manipulation and only would move the CA fluid then toss the card into the trash (immediately for safety precaution).

I have found another method (after posting this article) that works better for dispensing the CA - I utilize a low pressure air brush. Using an air brush to apply the CA allows for better fusion between the old poly and the new poly. This distribution method decreases the chance for air pockets and reduces the discolored ring that I had on my example featured in the photo's. This method requires an air brush and a lot of additional parts. The craftsmanship is far superior using this tool as the CA applicator but it is also far more expensive! If you are doing this for a business then without question you should apply CA on dents and crack with an air brush.

Next, I took a Single edge razor blade and wrapped scotch tape around the edges (warning - make sure you cover the blade and check the tape often or you will scratch the surface of the instrument), thus leaving the middle uncovered. The reason for the taped edges is so that the middle of the blade would work as a plane which would shave down the excess plastic fill stock. The tape also prevents damaging the area which I do not wish to plane down.


This photo is from FRETS.com

Once I plane the area near level to the surrounding area, I'll apply wet sand paper using turpentine as a lubricant while gentle sanding the area. I use usually sand paper that is very fine often above 1000 grit to start, then move to finer grit then finally buff the affected area.
Once I have sanded the guitar to my satisfaction I then apply the guitar to a buffing wheel to bring back the shiny finish.

Now the gap is filled, my fingers don't find it anymore and my brain knows the guitar is happier.

This is the finished product. Had I to do it over again I would have chipped out the dent so that there wasn't any shattered remnants of the original finish. I think the repair would have turned out better looking with less white flake on the perimeter of the repaired dent. This white ring is under the new surface and only visible under black light or direct flash light (evidence is in this photo). I will show other pictures where the repair is almost invisible. A lacquer finish would require the same amount of work but would require lacquer fill instead of Cyanoacrylate. I used Cyanoacrylate (super-glue) on my poly finish guitars. In contrast, Lacquer repairs are less evident upon completion but there is a trade off with finishes as the poly finish is far more durable and less prone to checking.

The following photo's are the finished product.


You really need to look hard to see the old damage. Being my own worst critic - I'd like a do over but for now you can learn from my experimentation. However, looks far better than it did and I don't snag my finger on the dent or nervously pick at it instead of the strings while noodling between songs!


Special Thanks to Frank Fork whose FRETS.COM gave me the inspiration and information needed to complete this project. Also Thanks to Alex Glasser who helped me with this project. Check out Alex's Iron Horse Instruments here!


Gratuitous glamor shot!

Wednesday, April 13, 2011

Meet your Maker - Joe Yanuziello.

Follow the journey of a hand built guitar with stringed instrument maker, Joe Yanuziello.
This is a nice video regarding building guitars. Watch and you will see why people are passionate about building guitars!

MEET YOUR MAKER from Asylum Artists on Vimeo.


An Asylum Artists production.

yanuziello.com/
asylumartists.com/​

The Asylum Artists Production Team:

Don Dixon - Director/ Photographer
Chris Reesor - Director/ Editor
Scott McIntyre - DP/Colorist
Shereen Mroueh - Digital Imaging Artist

Many Thanks:

Douglas Blais - Sound Engineer on Pool Jumper
Don Rooke - Yanuziello square neck resophonic guitar
Kevin Breit - Yanuziello round neck resophonic guitar
Linda Manzer, Chris Bennett, Carmen Yanuziello - Commentary

Sunday, April 10, 2011

Jeff Beck and Imelda May Band - Rocking San Francisco!

JEFF BECK AND THE IMELDA MAY BAND at the Fillmore San Francisco


This past Saturday I had the extreme privilege to witness some of the finest guitar work and music. This is the second time I've seen Jeff Beck in the Bay Area and I've never been disappointed. Oh no, Mr. Beck raises the bar each time I see him. This time he was here to pay homage to the late great Les Paul. Along with Jeff was the Imelda May band and if you missed them on Jules Holland's show then you are missing out. Ahem, there is a Rockabilly resurgence and it's super cool and Imelda's band is super talented. I am a picky listener and I couldn't find a weak link in the bunch. Just amazing vocals from Ms. May and a tight band. Oh yeah, accompanied by one guitar god Jeff Beck.

The best part, everybody on-stage enjoyed themselves. These people obviously were having fun as they traded 8th, 16th, modulated and any neophyte could see that the band and Jeff were tight and hitting the notes. The show was fun fun fun for the crowd and band alike!

You owe it to yourself to listen to Imelda May band because she is really a force and surprising that the american public hasn't gobbled them up, but then again, America is a weird and fickle listening crowd and all you need to do is remember The Clash, who are now iconoclasts but initially ignored by the American music consumers. Fine, more for me.

For the guitar geeks out there, Jeff played a number of instruments; A Beautiful Reissue 1959 Tiger Stripe Gibson Les Paul, Blond Gibson ES-175, Black Gretsch Jet, White Fender Strat (his name sake), Old Fender Tele were the guitars of choice this evening. His amplifiers were Marshall's and Fender Twins. For a change he did employ some delays for a slap back echo effect but for the better part of the night it was Vintage Jeff Beck tone, void of effects, and he kicked some serious glutenous maxi mus.

Tuesday, April 5, 2011

Help Keith Richards help Japan !


Go to Keith's site and buy a T-shirt that will make you rich and famous!

100% of the profit from these shirts go to "The Japanese Society Relief Fund."


Japan is certainly playing the blues.


Make a list - then do it


How many times have you realized that time has slipped by and that great big project is even further down the road from completion than yesterday? Common sense isn't very common and today is the tomorrow you worried about yesterday! Make a list of things you are working on and get busy! Mark off what you have completed and move on to the next item. Just don't get too caught up in making lists to the point that all you are doing is making lists.........! LOL

My examples of lists are as follows:

  • Created a list of my favorite songs to play on the acoustic guitar.
  • Listed my favorite jazz tunes to play (Bebop!).
  • Made a list of my guitar serial numbers and saved it in the computer.
  • List of tools I need.
See, it's easy to get carried away! The important part is to start making progress. Why did I post a picture of Duane Allman? Because Duane had the vision and persistence required to get many things done and if he didn't have drive he would have never risen to guitar God status during the short time he graced this planet. Amen brother Allman!